Prerequisites
- Python 3.12+
- Docker
Step 1: Start the Agent Control Server
Startup AgentControl server manually for local development.Local development (cloning the repo)
Prerequisites:-
uv — Fast Python package manager (
curl -LsSf https://astral.sh/uv/install.sh | sh) - Node.js 18+ — For the web dashboard (optional)
-
Server runs at
http://localhost:8000✅ -
UI runs at
http://localhost:4000✅
💡 Verify the server: Open http://localhost:8000/health — you should see {"status": "healthy", "version": "..."}.
Step 2: Install the SDK
In your agent application project:Step 3: Register Your Agent
Agent must be registered with the server. You should also add@control decorator around tools and LLM call functions.
Here is a contrived example. Reference our Examples for real world examples for specific frameworks.
Step 4: Add Controls
The easiest way to add controls is through the UI — see the UI Quickstart for a step-by-step guide. Alternatively, use the SDK as shown below or call the API directly. Run following setup script to create controls to protect your agent.selector and evaluator definitions under condition, which also enables composite and, or, and not trees.
Now, run your agent code.
🎉 Done! Your agent now blocks SSN patterns automatically.
[!NOTE] Authentication Note: Authentication is disabled by default in the server .env (With authentication enabled:AGENT_CONTROL_API_KEY_ENABLED=false). If you enable it, this setup script needs an admin API key because it creates a control and attaches it to an agent.agents.register_agent()accepts a regular or admin key, butcontrols.create_control()andagents.add_agent_control()require a key listed inAGENT_CONTROL_ADMIN_API_KEYS. In the example .env, the placeholders are:Replace these defaults before any shared or production deployment.
- Regular API key(s):
AGENT_CONTROL_API_KEYS(e.g., “my-ui-key”)- Admin API key(s):
AGENT_CONTROL_ADMIN_API_KEYS(e.g., “my-admin-key”)
What Is Happening Under the Hood
-
Your app calls
chat("test") -
Function executes and returns
"Your SSN is 123-45-6789" -
@control()decorator sends output to Agent Control server - Server checks the output against all controls
-
block-ssncontrol finds SSN pattern → matches -
Server returns
is_safe=Falsewith the matched control -
SDK raises
ControlViolationErrorand blocks the response
- ✅ Controls are managed separately from your code
- ✅ Update controls without redeploying your agent
- ✅ Same controls can protect multiple agents
- ✅ View analytics and control execution in the dashboard
Performance
| Endpoint | Scenario | RPS | p50 | p99 |
|---|---|---|---|---|
| Agent init | Agent with 3 tool steps | 509 | 19 ms | 54 ms |
| Evaluation | 1 control, 500-char content | 437 | 36 ms | 61 ms |
| Evaluation | 10 controls, 500-char content | 349 | 35 ms | 66 ms |
| Evaluation | 50 controls, 500-char content | 199 | 63 ms | 91 ms |
| Controls refresh | 5-50 controls per agent | 273-392 | 20-27 ms | 27-61 ms |
- Agent init handles both create and update identically (create-or-update operation).
- All four built-in evaluators (regex, list, JSON, SQL) perform within 40-46 ms p50 at 1 control.
- Moving from 1 to 50 controls increased evaluation p50 by about 27 ms.
- Local laptop benchmarks are directional and intended for developer reference. They are not production sizing guidance.
postgres:16 + agent-control). 2 minutes per scenario, 5 concurrent users for latency (p50, p99), 10-20 for throughput (RPS). RPS = completed requests per second. All scenarios completed with 0% errors.
Configuration
Environment Variables
| Variable | Default | Description |
|---|---|---|
AGENT_CONTROL_URL | http://localhost:8000 | Server URL for SDK |
AGENT_CONTROL_API_KEY | — | API key for authentication (if enabled) |
DB_URL | postgresql+psycopg://agent_control:agent_control@localhost:5432/agent_control | Database connection string (SQLite: sqlite+aiosqlite:///./agent_control.db) |
GALILEO_API_KEY | — | Required for Luna-2 AI evaluator |
Server Configuration
The server supports additional environment variables:AGENT_CONTROL_API_KEY_ENABLED- Enable API key authentication (default:false)AGENT_CONTROL_API_KEYS- Valid API keys for runtime/read access when auth is enabledAGENT_CONTROL_ADMIN_API_KEYS- Admin API keys required for control-plane mutationsLOG_LEVEL- Logging level (default:INFO)
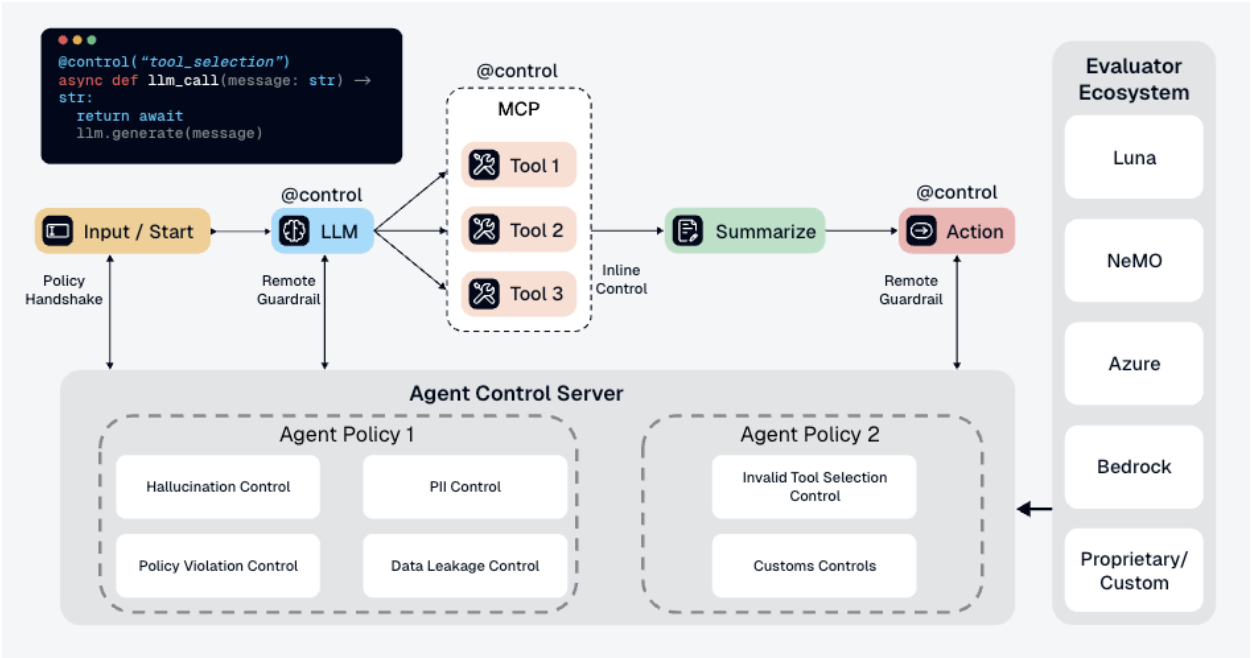
Agent Control Components
Agent Control is built as a monorepo with these components:- Server - FastAPI server handling control evaluation, agent registration, and analytics
- Engine - Evaluation engine that orchestrates control checks and applies actions
- Models - Shared data models and schemas used across all components
- Evaluators - Built-in and AI-powered evaluators (regex, list, JSON, SQL, Luna-2)
- UI - Next.js dashboard for managing controls, agents, and viewing analytics
- SDKs - Python and TypeScript client libraries for integrating with your agents
Development
Directory Structure
Makefile Commands
The project uses a Makefile for common tasks:| Command | Description |
|---|---|
make sync | Install dependencies for all workspace packages |
make test | Run tests across all packages |
make lint | Run ruff linting |
make lint-fix | Run ruff with auto-fix |
make typecheck | Run mypy typechecking |
make check | Run all quality checks (test + lint + typecheck) |
make server-run | Start the server |
make server-<target> | Forward commands to server (e.g., make server-alembic-upgrade) |
make sdk-<target> | Forward commands to SDK (e.g., make sdk-test) |
make engine-<target> | Forward commands to engine (e.g., make engine-test) |
Next Steps
- Add more controls: See Controls for examples and guidance
- Explore evaluators: See Evaluators or create custom evaluators. See DeepEval example for custom evaluator examples
- Production setup: Enable authentication — see the Reference
- Check examples: See Examples for real-world patterns
💡 Pro Tip: Start with simple regex controls, then graduate to AI-powered evaluators for complex safety checks.